

Knitting for Beginners Guide: Learn Basic Stitches Fast
Over 80 percent of new knitters feel overwhelmed when choosing their first supplies. Starting with the right tools is the foundation for a positive knitting experience and helps avoid frustration down the line. Whether you are picking up needles for the first time or refreshing your basics, understanding what you need and why each item matters gives you confidence to begin. This guide breaks down the essentials so you can start your knitting journey feeling prepared and supported.
Table of Contents
- Step 1: Gather Essential Knitting Supplies
- Step 2: Select The Right Yarn And Needles
- Step 3: Cast On Your First Row Correctly
- Step 4: Practice Fundamental Knitting Stitches
- Step 5: Finish And Check Your Project For Quality
Quick Summary
| Main Insight | Description |
|---|---|
| 1. Gather essential knitting supplies | Start with high-quality knitting needles and worsted weight yarn for a smooth learning experience. |
| 2. Select appropriate yarn and needles | Choose light-colored, medium weight yarns and wooden or bamboo needles to enhance control while knitting. |
| 3. Master the long tail cast on | Learn the long tail cast on method to establish a solid foundation for your knitting projects. |
| 4. Practice fundamental knitting stitches | Focus on mastering knit and purl stitches to build confidence and skill as a beginner knitter. |
| 5. Properly finish your projects | Complete your knitting with a clean bind-off and blocking to ensure quality and a professional look. |
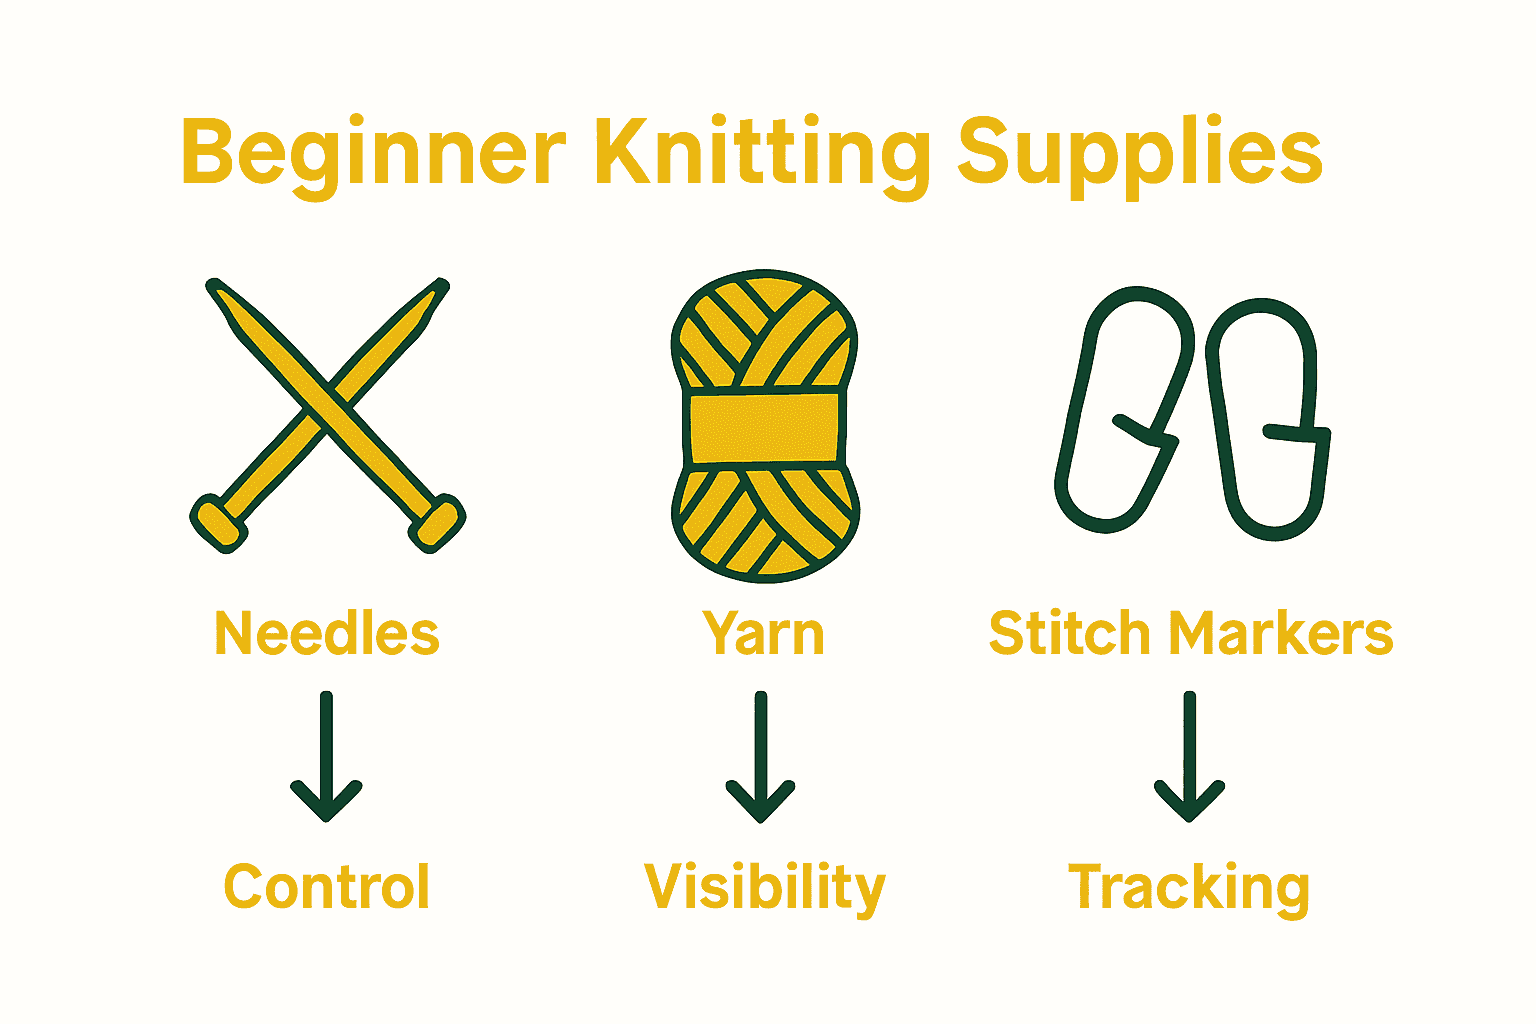
Step 1: Gather Essential Knitting Supplies
As you begin your knitting journey, having the right supplies is crucial for a smooth and enjoyable experience. According to montana.edu, gathering the right tools will set you up for success from the very start.
Your essential knitting kit should include several key items. First, you will need knitting needles in various sizes. Beginners typically start with medium sized needles like US sizes 7 to 9 (4.5mm to 5.5mm), which work well with medium weight yarns. Next, choose your yarn carefully. Look for yarns labeled as worsted weight or medium weight (category 4), which are most forgiving for new knitters. kansas4-h.org recommends selecting yarns in light solid colors for your first projects, as they make it easier to see your stitches.
Beyond needles and yarn, add some additional helpful tools to your kit. Grab a pair of sharp scissors for cutting yarn, a tape measure for checking gauge and project size, and stitch markers to help track your progress. A small notebook can also be invaluable for recording pattern notes or tracking your learning journey. When you choose your first supplies, focus on quality over quantity. Investing in good basic tools will make learning to knit much more enjoyable and help you build confidence quickly.
Ready to start selecting your first knitting materials? Let’s explore what makes each supply special in the next section.
Step 2: Select the Right Yarn and Needles
Choosing the perfect yarn and needles can make or break your first knitting experience. According to montana.edu, understanding the key factors in yarn and needle selection is essential for successful knitting.
When selecting yarn, focus on weight and fiber content. As kansas4-h.org recommends, beginners should start with medium weight yarns (category 4) that are smooth and easy to work with. Wool blends or acrylic yarns are great for first projects because they are affordable, durable, and forgiving. Look for yarns that are light in color to help you see your stitches clearly and avoid fuzzy or textured varieties that can complicate learning.
Needle selection is equally important. For beginners, straight needles in sizes US 7 to 9 (4.5mm to 5.5mm) work best with medium weight yarns. Materials matter too single point wooden or bamboo needles provide more grip and are less slippery than metal ones which can help you maintain better control while learning. If you are left handed or struggle with standard techniques, consider taking how to choose yarn for your next craft project to find specialized resources that match your specific needs.
Remember that your first yarn and needle combination is about building confidence. Start simple and gradually explore more complex materials as your skills improve.
Step 3: Cast On Your First Row Correctly
Learning to cast on is your first real step into the world of knitting. According to montana.edu, mastering this fundamental technique sets the foundation for all your future knitting projects.
The long tail cast on method is perfect for beginners. kansas4-h.org recommends this technique for its versatility and clean edge. Start by creating a slip knot about 6 inches from the yarn end. Hold the needle in your dominant hand and the yarn in the other. Drape the yarn over your thumb and index finger forming a loop. Insert your needle under the thumb loop, then wrap the yarn around the needle and pull through. This creates your first stitch. Repeat this process until you have the desired number of stitches for your project.
A pro tip for beginners is to leave a generous tail when casting on approximately 1 inch per stitch you plan to cast. This prevents running out of yarn midway and ensures a smooth start. Practice your tension to keep stitches consistent not too tight or too loose. If you find yourself struggling, consider exploring the 7 essential types of yarn fibers to understand how different materials might impact your casting on technique.
With your first row now cast on, you are ready to begin your first knitting adventure.
Step 4: Practice Fundamental Knitting Stitches
You are about to learn the two most critical stitches that form the foundation of all knitting projects. According to kansas4-h.org, mastering the knit and purl stitches is essential for every beginner knitter.
Start with the basic knit stitch. Hold your needle with the cast on stitches in your left hand and the empty needle in your right hand. Insert the right needle into the front of the first stitch from left to right. Wrap the yarn around the right needle counterclockwise, then pull this wrapped yarn through the stitch. Slide the old stitch off the left needle. This completes one knit stitch. Practice this motion until it feels smooth and consistent. The purl stitch is essentially the reverse of the knit stitch. Insert the right needle from right to left behind the stitch, wrap the yarn differently and pull through.
Remember that muscle memory is key. Practice each stitch slowly and deliberately. If you find yourself struggling, take a break and return with fresh eyes. You might want to explore beginner crochet stitches tutorial to understand how different fiber crafts approach similar techniques. With consistent practice, these fundamental stitches will soon become second nature.
Congratulations. You have just learned the building blocks of knitting.
Step 5: Finish and Check Your Project for Quality
You have reached the final stage of your first knitting project. According to montana.edu, properly finishing your project is just as important as creating the stitches themselves.
To bind off your project, knit two stitches. Then use the first stitch you knitted to lift it over the second stitch and off the needle. Continue this process across the entire row until only one stitch remains. Cut your yarn leaving a 6-inch tail. Pull this tail through the final loop and tighten to secure. kansas4-h.org recommends blocking your finished piece by gently washing it and laying it flat to dry. This helps even out your stitches and gives your project a professional appearance.
When checking your project quality, look for consistent tension smooth edges and no dropped stitches. If you notice imperfections do not be discouraged. Every knitter started exactly where you are now. For additional insights into perfecting your craft, explore the crochet finishing techniques guide to understand broader fiber craft finishing methods.
Congratulations on completing your first knitting project.
Start Your Knitting Adventure with the Right Tools
Learning to knit can feel overwhelming at first especially when choosing the right yarn and needles for your project. This guide helped you understand crucial steps like selecting the best medium weight yarn and mastering basic stitches like knit and purl which are essential building blocks. Now you can bring these lessons to life with quality supplies designed to make your journey enjoyable and frustration free.
Explore our extensive collection of Yarn that features beginner-friendly fibers in ideal colors and textures. Whether you want smooth acrylics or cozy wool blends you will find perfect options to boost your confidence and keep your stitches neat. Keep your projects neat and portable by browsing durable Yarn Bags that protect your materials while you knit anywhere.
.png)
Begin crafting beautiful pieces today with dependable tools and materials from CRAFTISS. Don’t wait to turn your new skills into real projects. Shop now to enjoy products made specifically for new knitters like you and experience the reward of creating with ease and joy.
Frequently Asked Questions
What are the essential knitting supplies I need to start?
You will need knitting needles, yarn, scissors, a tape measure, stitch markers, and a notebook. Begin with medium-sized needles (US sizes 7 to 9) and worsted weight yarn for your first projects.
How do I choose the right yarn for beginners?
Select medium weight yarns that are smooth and light in color to help see your stitches clearly. Wool blends or acrylic yarns are recommended as they are affordable and easier to handle.
What is the long tail cast on method, and how do I do it?
The long tail cast on is a technique where you create a slip knot and use a portion of yarn as a ‘tail’ to create stitches. Practice making your first stitch by wrapping the yarn around your needle and pulling through, repeating until you reach the desired number of stitches.
Can you explain the basic knit and purl stitches?
The knit stitch is done by inserting the right needle into the front of the left stitch, wrapping the yarn, and pulling it through. The purl stitch is the reverse, where you insert the needle behind the stitch, wrap the yarn differently, and pull through.
How do I properly bind off my knitting project?
To bind off, knit two stitches, then lift the first stitch over the second and off the needle, continuing until only one stitch remains. Cut the yarn leaving a 6-inch tail, pull it through the final stitch, and tighten to secure.
What should I check to ensure the quality of my finished project?
Examine your project for consistent tension, smooth edges, and ensure there are no dropped stitches. If imperfections are noticed, remember that practice leads to improvement, so keep up the work!
Recommended
- Beginner Crochet Stitches Tutorial: Master Basic Techniques Fast – CRAFTISS
- How to crochet with yarn: your ultimate beginner’s guide to mastering – CRAFTISS
- 7 Essential Types of Crochet Stitches Every Crafter Should Know – CRAFTISS
- Crochet Stitch Guide: Master Essential Stitches Easily – CRAFTISS


