

Step by Step Crochet Bag: Create Your Unique Tote
Crochet bags are making a comeback, and everyone wants that perfect handcrafted tote for daily use or gifting. The surprising part is that even first-time crafters can pull off a stylish, sturdy bag with nothing but yarn and a hook. In fact, cotton yarn used in crochet bags is machine washable and resists stretching, so your creation will last way longer than most store-bought options.
Table of Contents
- Step 1: Gather Your Materials And Tools
- Step 2: Create The Base Of The Bag
- Step 3: Build The Bag Sides With Crochet Stitches
- Step 4: Add Handle And Finishing Touches
- Step 5: Verify Strength And Quality Of The Bag
Quick Summary
| Key Point | Explanation |
|---|---|
| 1. Choose high-quality yarn | Opt for medium weight cotton or blend yarn for durability and easy maintenance. This ensures a well-structured tote that can be machine washed. |
| 2. Gather essential crochet tools | Prepare necessary tools such as a crochet hook, scissors, and a tapestry needle to streamline your crafting process and improve your comfort while crafting. |
| 3. Create a sturdy base | Start with a magic ring and single crochet to establish a strong foundation, ensuring it maintains a flat and even shape for the tote. |
| 4. Maintain consistent stitch tension | During construction of the sides, keep uniform tension to avoid uneven walls and achieve a professional finish on your tote bag. |
| 5. Assess strength before use | Test the completed bag’s structure by filling it with weight, checking for any distortions or weaknesses, ensuring it is both functional and durable. |
Step 1: Gather Your Materials and Tools
Successful crochet projects begin with thoughtful preparation, and creating your unique step by step crochet bag requires selecting the right materials and tools. Before diving into the crafting process, understanding what you need will set the foundation for a smooth and enjoyable experience.
Essential Crochet Bag Materials
For this project, you will need high quality yarn that provides both durability and aesthetic appeal. Consider selecting a medium weight cotton or cotton blend yarn, which offers excellent structure and flexibility for a tote bag. The recommended yarn weight ranges between 4 medium or worsted weight options, providing enough body and strength for your bag’s design.
Your yarn selection should prioritize fiber content that can withstand regular use. Cotton yarns are particularly excellent because they are machine washable, resistant to stretching, and maintain their shape well. Look for yarns with minimal elasticity to ensure your bag retains its intended form after completion.
Crochet Tools Checklist
Gathering the right tools makes your crafting journey smoother and more enjoyable. Here are the critical tools you will need:
- Crochet hook (recommended size H/8 or 5mm)
- Scissors
- Tapestry needle for weaving in ends
- Stitch markers
- Measuring tape
- Optional: Row counter
Choose a crochet hook that complements your chosen yarn weight. The hook size impacts your project’s overall texture and size, so matching it correctly is crucial. Ergonomic hooks can help reduce hand fatigue during longer crafting sessions.
Before starting, ensure your workspace is well lit and comfortable. Organize your materials within easy reach to create an efficient crafting environment. Taking time to prepare thoroughly will help you avoid interruptions and maintain your creative momentum while working on your step by step crochet bag.
Here is a table summarizing the essential tools and materials needed to start your crochet bag project. This quick reference helps ensure you have everything you need before you begin.
| Item | Recommended Type | Purpose/Use |
|---|---|---|
| Yarn | Medium weight cotton or blend | Provides durability, flexibility, and structure |
| Crochet hook | H/8 (5mm) | Primary tool for making stitches |
| Scissors | Sharp, small | Cutting yarn and trimming ends |
| Tapestry needle | Blunt tip, large eye | Weaving in yarn ends for a clean finish |
| Stitch markers | Locking, plastic or metal | Marking rounds and stitch positions |
| Measuring tape | Flexible, soft | Measuring base diameter and bag height |
| Row counter (optional) | Manual or digital | Helping track rows for accuracy |
Preparing your materials is more than a preliminary step it is the foundation of a successful crafting experience. By carefully selecting high quality yarn and having all necessary tools ready, you set yourself up for an enjoyable and rewarding project.
Step 2: Create the Base of the Bag
The foundation of your step by step crochet bag begins with creating a sturdy and well structured base. This critical step determines the overall shape and stability of your finished tote, making precision and technique essential for a professional looking result.
Starting Your Base Crochet Circle
Begin by creating a magic ring, which provides a tight and seamless starting point for circular crochet projects. To form the magic ring, create a loop with your yarn, leaving a tail of approximately 6 inches. Hold the loop between your thumb and forefinger, then insert your crochet hook and work your initial stitches directly into the ring.
For a standard tote bag base, start with a chain of 4 stitches and join them into a circle using a slip stitch. This creates a compact center from which you will expand your bag’s foundation. Single crochet will be your primary stitch for this section, providing a dense and stable fabric that supports the bag’s structure.
Working in continuous rounds is crucial for maintaining an even and smooth circular shape. As you progress, each round will increase the diameter of your base. A typical tote bag base might require 8 to 10 rounds of increasing stitches, depending on your desired bag size.
To increase your stitches evenly, you will need to add extra stitches at regular intervals. A standard method involves increasing the number of single crochet stitches between increases in each subsequent round.
This technique prevents your base from becoming wavy or misshapen.
Checking Your Base Construction
Verify your base construction by measuring its diameter periodically. Here are key indicators that your base is developing correctly:
- Flat and even circular shape without ruffling or curling
- Consistent stitch tension throughout the rounds
- Smooth transition between increase points
- Diameter matching your intended bag size
As you complete each round, pause and lay your work flat to assess its shape and size. Minor adjustments during the process are easier to make than correcting the entire base after multiple rounds.

Remember that practice and patience are key. The base of your crochet bag sets the foundation for the entire project, so take your time and maintain consistent tension. Each stitch contributes to the overall strength and appearance of your unique handcrafted tote.
Step 3: Build the Bag Sides with Crochet Stitches
After creating a solid base, the next phase of your step by step crochet bag involves constructing the sides with precision and consistency. This crucial stage transforms your circular foundation into a three dimensional tote, requiring careful attention to stitch technique and tension.
Transitioning from Base to Sides
Building upon your established circular base, you will now transition to creating the vertical walls of your bag. Continuous single crochet stitches will form the primary structure, providing strength and maintaining the shape you established in the previous step. Begin by working single crochet stitches into each stitch around your base, maintaining the same number of stitches you completed in your final base round.
As you progress through the rounds, maintain consistent tension to ensure your bag sides remain uniform and smooth. Each stitch should be worked with the same level of tightness, creating a clean and professional appearance. Learn more about mastering basic crochet techniques to refine your skills and create a polished final product.
Shaping and Maintaining Bag Structure
To prevent your bag from becoming too wide or narrow, you will need to manage your stitch count carefully. Unlike the base rounds where increases were necessary, the side rounds require maintaining a consistent number of stitches. This creates straight, vertical walls that give your tote its classic shape.
When working the sides, pay close attention to the following key aspects:
- Keep your working yarn tension even
- Count stitches in each round to ensure consistency
- Check that the bag sides remain perpendicular to the base
- Periodically pause and lay your work flat to assess shape
Depending on your desired bag height, you might work anywhere from 15 to 25 rounds of single crochet. The exact number will depend on your specific pattern and personal preference for tote bag dimensions.
As you near your desired height, begin to mentally prepare for the next stages of bag construction, such as adding handles or creating decorative edges. Each round brings you closer to completing your unique handcrafted tote, transforming simple yarn and stitches into a functional and beautiful accessory.
Use this step overview table to see the main stages of creating a crochet bag, along with key actions and what you should focus on at each point.
| Step | Key Action | Main Focus/Result |
|---|---|---|
| Gather Materials & Tools | Select high-quality yarn and tools | Preparation for a smooth project |
| Create Base | Crochet a circular flat base | Strong, even foundation |
| Build Bag Sides | Single crochet in rounds, maintain tension | Straight, uniform tote walls |
| Add Handles & Finishing Touches | Attach strong handles and weave ends | Durability and finished look |
| Verify Strength & Quality | Inspect structure, test for durability | Reliable, functional finished bag |
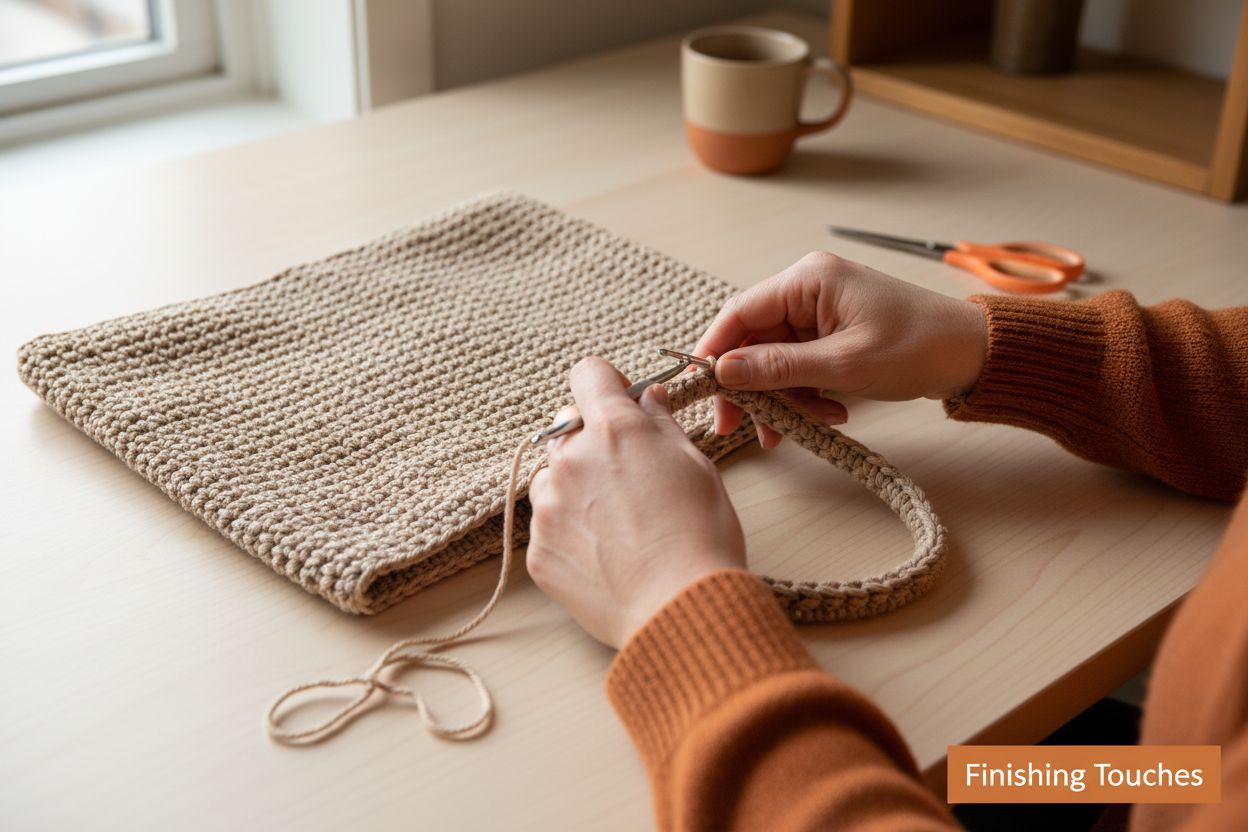
Step 4: Add Handle and Finishing Touches
The final stage of your step by step crochet bag transforms your handcrafted project from a simple fabric structure into a functional and stylish accessory. Adding handles and completing the finishing details will determine the bag’s overall durability, comfort, and aesthetic appeal.
Creating Strong and Comfortable Handles
Handle construction requires careful consideration of both form and function. Sturdy handles are essential for ensuring your bag can comfortably carry everyday items without stretching or breaking. Begin by determining your preferred handle style whether you want long shoulder straps or shorter hand carried handles.
To create handles, you will work additional rounds of single crochet, typically starting at opposite sides of the bag. Measure and mark equal distances on each side to ensure symmetry. Master your crochet finishing techniques to ensure professional looking results that enhance your bag’s overall quality.
For increased strength, consider working your handles using a combination of single and double crochet stitches. This technique provides extra reinforcement while maintaining flexibility. Aim for handles approximately 1 inch wide and long enough to provide comfortable carrying options.
Final Detailing and Reinforcement
Once your handles are attached, focus on the critical finishing touches that elevate your handmade tote from good to exceptional. Weaving in loose yarn ends is crucial for a polished appearance and preventing unraveling. Use your tapestry needle to carefully thread yarn ends back through several stitches, ensuring they are secure and nearly invisible.
Key aspects to verify in your finished bag include:
- Handles are symmetrically positioned
- No loose yarn ends are visible
- Bag maintains its intended shape when held
- Stitches are uniform and tight
- No unexpected gaps or holes in the fabric
Consider blocking your completed bag by lightly steaming or washing it according to your yarn’s care instructions. This process helps set the stitches and can improve the overall drape and appearance of your crochet tote.
With patience and attention to detail, you have now created a unique, handcrafted bag that reflects your creativity and skill.
 Each stitch represents a personal touch, transforming simple yarn into a functional and beautiful accessory you can proudly use or gift to someone special.
Step 5: Verify Strength and Quality of the Bag
After investing time and creativity into your step by step crochet bag, the final critical stage involves thoroughly assessing its structural integrity and overall craftsmanship. This comprehensive evaluation ensures your handmade tote meets both aesthetic and functional standards.
Structural Integrity Assessment
Begin by conducting a visual and tactile inspection of your completed bag. Carefully examine every section, paying special attention to areas of potential weakness such as handle attachments, base connections, and stitch consistency. Gently stretch and manipulate the bag to test its resilience and elasticity. Research from textile craft studies emphasizes the importance of thorough post construction evaluation to ensure long term durability.
Weight testing provides another crucial method of assessing your bag’s structural strength. Fill the bag with items approximating its intended use weight books, groceries, or daily essentials. Observe how the bag responds under pressure, checking for any unexpected stretching, distortion, or potential stitch separation. A well constructed crochet bag should maintain its shape and support weight without significant deformation.
Performance and Durability Verification
Beyond initial visual assessment, practical testing reveals your bag’s true quality. Simulate real world scenarios by carrying the bag around your living space, paying attention to how handles distribute weight and whether the bag maintains its intended shape. Look for these critical indicators of high quality craftsmanship:
- Handles remain securely attached
- No unexpected stretching or sagging occurs
- Stitches remain tight and uniform
- Bag retains its original geometric shape
- No loose yarn ends become visible during movement
Consider performing a gentle washing test according to your specific yarn’s care instructions. This process not only verifies the bag’s washability but also helps set the stitches and potentially improve the overall fabric structure. Some crafters find that a light blocking technique after washing can further enhance the bag’s final appearance and durability.
Remember that minor imperfections are part of handmade charm. Your step by step crochet bag represents a personal creative journey, with each stitch reflecting your developing skill and artistic expression. Embrace the unique characteristics that distinguish handcrafted items from mass produced accessories.
Elevate Your Handmade Crochet Bag with CRAFTISS Solutions
Are you excited about creating your own unique tote, but worried your materials or accessories might let you down? Many crafters struggle with finding durable yarns that keep their projects looking fresh or stylish storage that matches their creative spirit. If you want your new bag to stay strong and beautiful, start by choosing the right supplies and keeping your crochet tools organized.
Explore our Yarn Bags Collection and see how easy it is to keep all your essentials handy while working on your next masterpiece.
.png)
Make this your best project yet with every stitch. Shop the highest-quality yarn and handy storage options at CRAFTISS today. Elevate your tote with materials made for real makers, and experience the difference on your very next creation.
Frequently Asked Questions
What materials do I need to create a crochet bag?
You will need medium weight cotton or cotton blend yarn, a crochet hook (recommended size H/8 or 5mm), scissors, a tapestry needle, stitch markers, and a measuring tape. Optional tools like a row counter can also be helpful.
How do I start the base of my crochet bag?
To start the base, create a magic ring and chain 4 stitches, joining them with a slip stitch to form a circle. Then, work single crochet stitches into the ring, increasing the diameter over several rounds to form a sturdy base.
How can I ensure the sides of my crochet bag are even and straight?
Maintain consistent stitch tension and keep the same number of single crochet stitches as you work up the sides. Periodically lay your work flat to assess its shape and ensure it remains perpendicular to the base.
What should I do for finishing touches on my crochet bag?
For finishing touches, securely attach the handles, weave in all loose yarn ends with a tapestry needle, and consider blocking the bag to improve its shape. Verify that handles are symmetrically positioned and that the bag maintains its intended shape when held.
Recommended
- How to crochet with yarn: your ultimate beginner’s guide to mastering – CRAFTISS
- How to Design Crochet Patterns: Create Unique Designs Easily – CRAFTISS
- How to Make Tassels: A Simple Guide – CRAFTISS
- Turquoise Yarn Storage Bag - Tote Yarn Bag, Durable Knitting and Croch – CRAFTISS
- Vintage Handbags - A History of Girl’s Best Friend | Vintage Handbag | Vintage Bags
- Top Ten - Vintage Bags


