

Crochet Bag Making Workflow: Step-by-Step Project Guide
Did you know that a well-chosen yarn can make your crochet bag last for years? Many crafters overlook this step, yet it is the secret to a bag that holds its shape and survives daily use. Picking the right materials and pattern is not just about style but also about durability. This guide brings you practical tips and research-backed choices so you can start your crochet bag project with confidence.
Quick Summary
| Key Point | Explanation |
|---|---|
| 1. Choose durable yarn types | Opt for sturdy fibers like cotton, linen, or hemp to ensure your bag withstands daily use and maintains its shape. |
| 2. Start with a clear pattern | Select beginner-friendly patterns with straightforward instructions to build confidence and ease in your crocheting process. |
| 3. Create a solid foundation | Focus on symmetry and consistent tension when building the base to avoid structural issues in your bag’s design. |
| 4. Employ consistent tension in body | Maintain even tension throughout to ensure a well-shaped body and prevent distortion in your finished bag. |
| 5. Reinforce and check handle attachment | Securely attach handles with reinforced techniques and inspect for stability to enhance both aesthetics and durability. |
Table of Contents
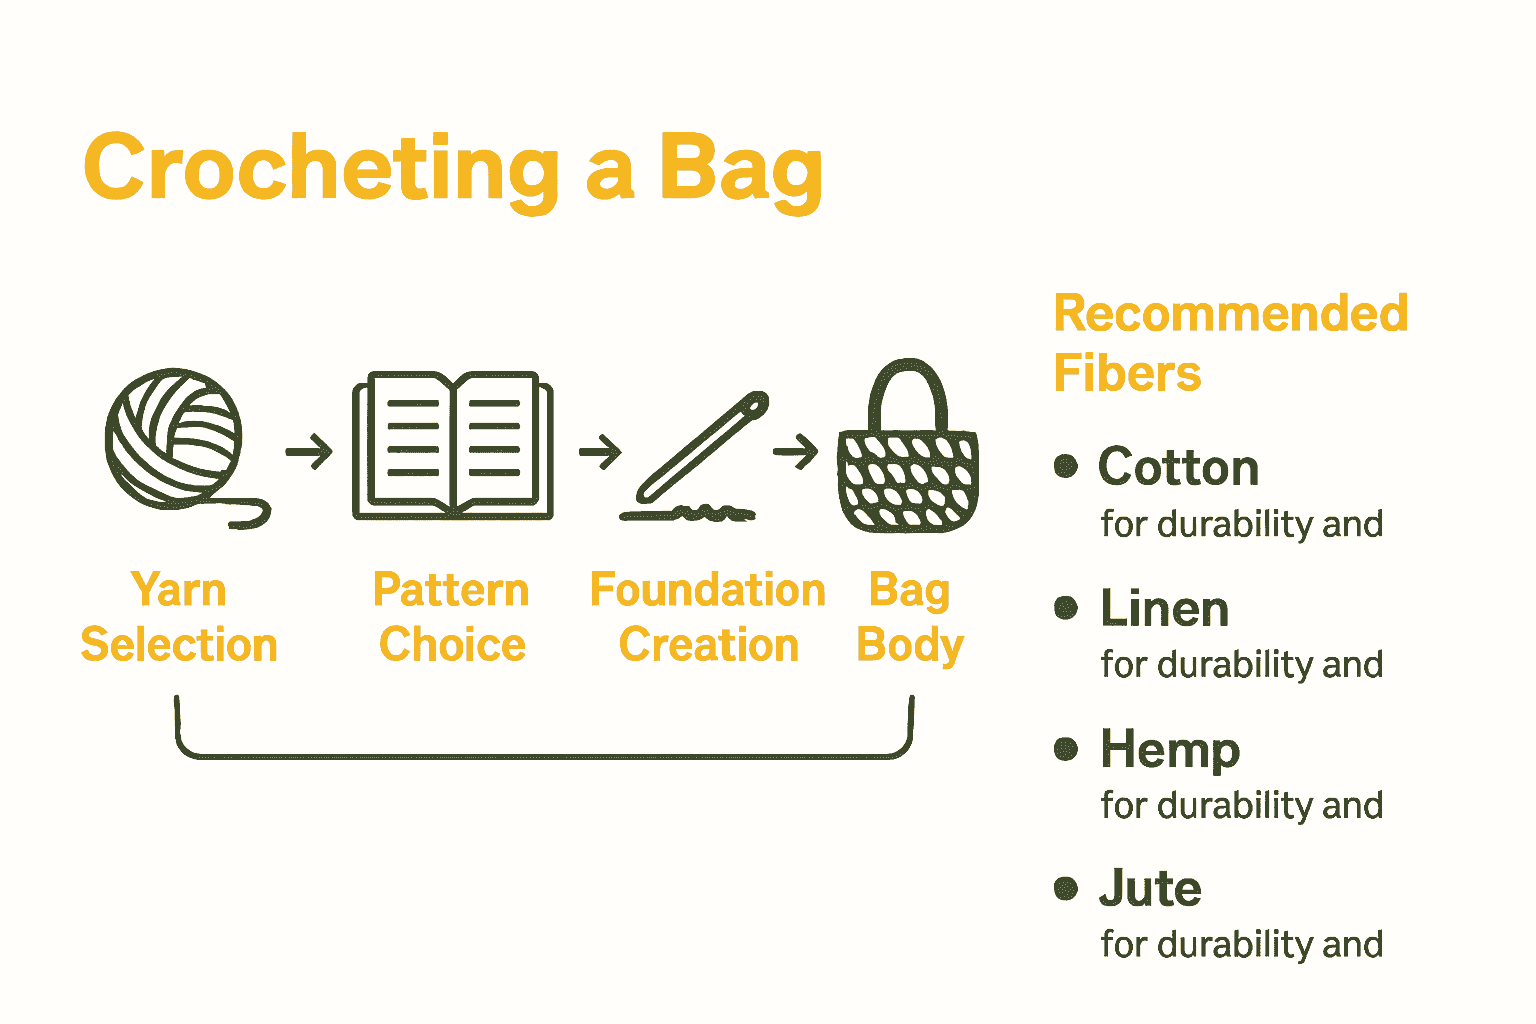
- Step 1: Gather Essential Supplies And Choose Yarn
- Step 2: Select A Suitable Bag Pattern
- Step 3: Create A Strong Crochet Foundation
- Step 4: Crochet The Main Bag Body
- Step 5: Assemble, Attach Handles, And Check Quality
Step 1: Gather Essential Supplies and Choose Yarn
Ready to create a beautiful crochet bag that stands up to daily wear and looks fantastic? This step is all about selecting the right materials that will transform your project from simple craft to stunning accessory.
Start by choosing a yarn that can handle real world use. According to crafting research on bag construction, sturdy fibers like cotton, linen, hemp, or jute work best for creating structured bags that maintain their shape. These natural fibers provide excellent durability and strength.
For your first bag project, select a medium weight yarn (DK weight) or heavier options like worsted or bulky weight. These thicker yarns create more stable and structured bag walls that resist sagging and stretching. Pro tip: Consider yarns with some natural stiffness or slight elasticity that will help your bag keep its intended shape.
Your basic supply list should include:
Here’s a comparison of popular yarn fiber options for crochet bags:
| Fiber Type | Durability | Structure | Common Uses |
|---|---|---|---|
| Cotton | High | Firm | Everyday totes Purses |
| Linen | High | Crisp | Summer bags Beach totes |
| Hemp | Very High | Stiff | Market bags Utility totes |
| Jute | Very High | Extra Firm | Eco bags Shopping bags |
| Acrylic | Moderate | Soft | Fashion purses Light totes |
- Crochet hook matching your chosen yarn weight
- Sturdy yarn in your preferred color (cotton or cotton blend recommended)
- Scissors
- Measuring tape
- Stitch markers
- Darning needle for weaving in ends
If you want extra structural support, consider a clever reinforcement technique. Read more about yarn reinforcement techniques that can help your bag maintain its shape, like carrying multiple strands together or incorporating a firm supporting thread.
By carefully selecting your materials, you are setting the foundation for a professional looking crochet bag that will turn heads and stand up to regular use. Get ready to move on to the next exciting step of your crafting journey.
Step 2: Select a Suitable Bag Pattern
Now that you have your materials ready, it is time to choose a bag pattern that matches your skill level and creative vision. Selecting the right pattern is like finding the perfect recipe for a delicious meal your first try matters.
According to crochet pattern research, beginner friendly patterns often include specific structural elements like foundation chain multiples and clear handle placement instructions. Look for patterns that specify something like a multiple of 13 + 6 in their foundation chain this helps ensure consistent sizing and symmetry.
Consider the bag style that suits your lifestyle. Are you creating a small clutch for evening events or a spacious tote for daily errands? Some key factors to evaluate include bag dimensions, handle length, and overall structural design. Explore different bag design options to find a pattern that resonates with your personal style.
When reviewing patterns, pay attention to these important details:
- Skill level indication (beginner, intermediate, advanced)
- Required yarn weight and recommended hook size
- Total number of stitches and rows
- Special stitch techniques like fishbone stitch or tapering
- Handle attachment method
Tip: For your first project, choose a pattern with clear step by step instructions and preferably a video tutorial. This will help you navigate any challenging sections and build confidence in your crocheting skills.
With your perfect pattern selected, you are now ready to transform those carefully chosen materials into a stunning crochet bag.
 The next step will guide you through preparing your workspace and beginning the exciting process of bringing your bag to life.
Step 3: Create a Strong Crochet Foundation
Ready to build the backbone of your crochet bag? Creating a solid foundation is like constructing the perfect building base your entire project will depend on this crucial first step.
According to crochet bag construction research, crafting an oval base requires strategic techniques. Start by chaining a length appropriate for your bag size and then work single crochet stitches around both sides of the initial chain. The key is increasing stitches at both ends to maintain a symmetrical shape.
As recommended by yarn crafting experts, consider joining your yarn in the middle of a short side chain for an almost invisible start. This technique provides a clean professional looking foundation. Pro tip: Chain 2 and work multiple double crochets in the top loops to create a sturdy initial structure.
Learn more about essential crochet techniques that will help you perfect your foundation. When building your base rounds, use back loop only single crochet to create a stable ridge that adds structural integrity to your bag.
Remember these critical foundation building points:
- Work increases symmetrically at both ends
- Use consistent tension
- Count your stitches carefully
- Place extra stitches at corners for proper shaping
Warning: Uneven foundations can lead to bags that twist or sit awkwardly. Take your time and double check your work.
With a rock solid foundation complete, you are now ready to transition into creating the body of your beautiful crochet bag. The next steps will guide you through transforming this base into a stunning finished project.
Step 4: Crochet the Main Bag Body
With your foundation complete, it is time to bring your bag to life by crocheting the main body. This is where your bag starts to take shape and your creativity truly shines.
According to crochet bag construction research, the body should be constructed in continuous rounds using techniques that provide structure and stability. Most crafters recommend using back loop single crochet or half double crochet stitches to create a firm yet flexible fabric that holds its shape beautifully.
Begin working in rounds from your established base, maintaining consistent tension to ensure even growth. If you want to add visual interest, this is an excellent opportunity to incorporate color changes or create stripe patterns. Explore different color work techniques to make your bag uniquely yours.
Key considerations for body construction include:
- Maintain steady round increases
- Check your work frequently for evenness
- Use stitch markers to track round beginnings
- Keep your tension consistent
Pro tip: Count your stitches at the end of each round to prevent unintentional increases or decreases that could distort your bag shape. A misplaced stitch now can mean a wonky bag later.
As you progress through the body rounds, youll start to see your bag taking its final form. The next steps will guide you through finishing touches like handles and any decorative elements that will transform this piece from a simple project to a stunning accessory.
Step 5: Assemble, Attach Handles, and Check Quality
You are on the home stretch of creating your beautiful crochet bag. This final stage transforms your handmade project from a simple piece of fabric into a functional and stylish accessory.
According to handbag crafting research, handle attachment is crucial for both aesthetics and durability. Professional crafters recommend reinforcing handles by embedding cord inside or using self adhesering silicone tape for extra strength. Place your handle attachments just above the final row to ensure optimal weight distribution.
Choose handle materials that complement your bag style. Options range from classic leather to trendy bamboo or even metal chains. Explore different handle design techniques that can elevate your bag from homemade to handcrafted.
Key steps for professional handle attachment:
- Use stitch markers to ensure symmetrical placement
- Sew handles securely with whip or mattress stitch
- Leave long yarn tails for reinforcement
- Consider adding a fabric lining for extra durability
As recommended by crochet experts, do a thorough quality check. Weave in all loose ends carefully and inspect your bag for any potential weak points. Optional finishing touches like magnetic or button closures can add a professional final flourish.
Warning: Rushing through handle attachment can compromise your entire project. Take your time and ensure each stitch is secure and symmetrical.
Congratulations on completing your crochet bag. Your handmade creation is now ready to showcase your creativity and crafting skills.
Bring Your Crochet Bag Vision to Life with Craftiss
Are you ready to turn your step-by-step bag making know-how into a project you can actually use and love? Choosing sturdy fibers and strong yarns, selecting the right project pattern, and securing durable handles are essential for a bag that holds up. But hunting for quality supplies and the perfect bag style can slow you down and leave you frustrated if you don’t know where to look.
Explore our wide selection of yarn bags to find ready-to-use totes, purses, and project bags that fit your style and needs perfectly.
.png)
Already dreaming up your own design or inspired by the article’s workflow? Discover premium yarns chosen especially for crafters like you, or visit Craftiss to unlock the full collection of tools and creative resources. Start shopping now and transform your next crochet bag project into a beautiful reality—your perfect bag begins here.
Frequently Asked Questions
What materials do I need to start making a crochet bag?
To begin your crochet bag project, gather sturdy yarn like cotton or jute, a crochet hook matching your yarn weight, scissors, measuring tape, stitch markers, and a darning needle. Ensure you select medium to bulky weight yarn for a structured design.
How do I choose the right crochet bag pattern based on my skill level?
Select a bag pattern that indicates your skill level, whether it’s beginner, intermediate, or advanced. For best results, find patterns with clear instructions and visuals to guide you, especially if it’s your first time crocheting a bag.
What techniques should I use to create a strong foundation for my crochet bag?
To create a solid foundation, chain a length suitable for your bag size and increase stitches symmetrically around the initial chain. Utilize back loop only single crochet stitches to build a stable base, ensuring your bag won’t twist or sag as you progress.
How can I maintain even tension while crocheting the main body of my bag?
Maintaining consistent tension is crucial for an even bag structure. To help with this, focus on counting your stitches at the end of each round and using stitch markers to track round beginnings for accurate measurements that aid in even growth.
What are the best practices for attaching handles to my crochet bag?
For secure handle attachment, use stitch markers for symmetrical placement and reinforce the handles by sewing them with a whip or mattress stitch. Consider leaving long yarn tails for extra support, ensuring that your handles can withstand daily use without detaching.
How do I finish my crochet bag and check its quality?
Finish your crochet bag by weaving in all loose ends and inspecting for any weak points or inconsistencies. Add optional features like closures, and ensure all components are securely attached; this final check is key to presenting a polished, functional accessory.
Recommended
- Step by Step Crochet Bag: Create Your Unique Tote – CRAFTISS
- How to crochet with yarn: your ultimate beginner’s guide to mastering – CRAFTISS
- Ultimate Crochet Pattern Organization Guide for Crafters – CRAFTISS
- How to Select Crochet Projects for Crafting Success – CRAFTISS


